 /SLASHPLAY
Counter-Strike: Source plugins and mods
Add SourceMod plugins to your CS:Source server: one-click curated plugins, your team's mod library, uploading your own, the folder layout and adding admins.
Every SLASHPLAY Counter-Strike: Source server comes with MetaMod:Source and SourceMod 1.13 already installed, so SourceMod plugins work without any setup. There are three ways to add them, from easiest to most flexible:
| Where | What it’s for |
|---|---|
| Game-specific → Plugins | Curated plugins we’ve tested on our servers. One click. |
| Mods tab | Your team’s own library: upload a plugin once, install it on any of your team’s CS:Source servers. |
| Advanced → Files | Full control: put any file anywhere, edit configs by hand. |
All three need the Control servers permission on the team.
Plugins: the curated list
Open Game-specific → Plugins. Each plugin is downloaded from its official source, checked against a known fingerprint, extracted into the server’s addons folder, and applied with a restart.
Today the list has one plugin:
- CSS:DM (v2.1.6): AlliedModders’ Counter-Strike: Source deathmatch plugin with respawns, weapon menus, spawn protection, and bot quotas. It’s what the Deathmatch preset in Modes switches on.
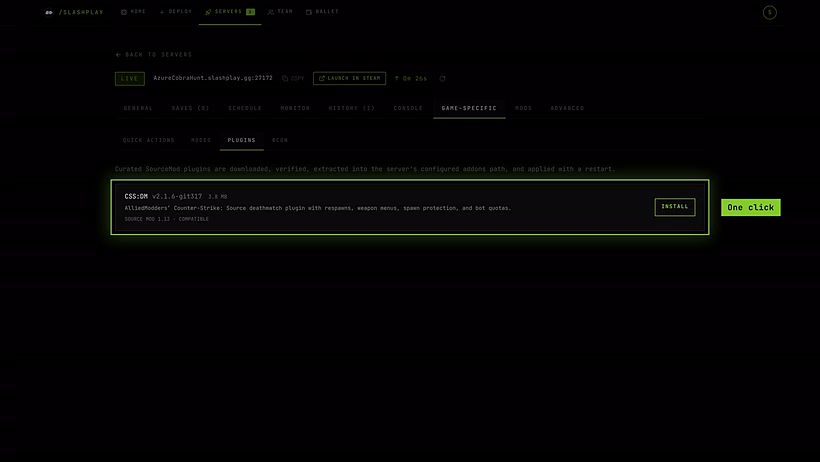
Each row shows the version, the size and a compatibility line such as SourceMod 1.13 · Compatible. A plugin built for a different SourceMod version shows Incompatible and can’t be installed.
Steps
- Make sure the server is Live. When it isn’t, the panel says Start the server to install or remove plugins.
- Click Install next to the plugin.
- Confirm with Install & restart. The server restarts to download, extract and enable the plugin, and connected players are kicked.
- Wait for Live again. The plugin is now loaded.
To remove it, click Uninstall and confirm. The plugin’s files are removed and the server restarts.
The Mods tab
The Mods tab, next to Game-specific, has four sections.
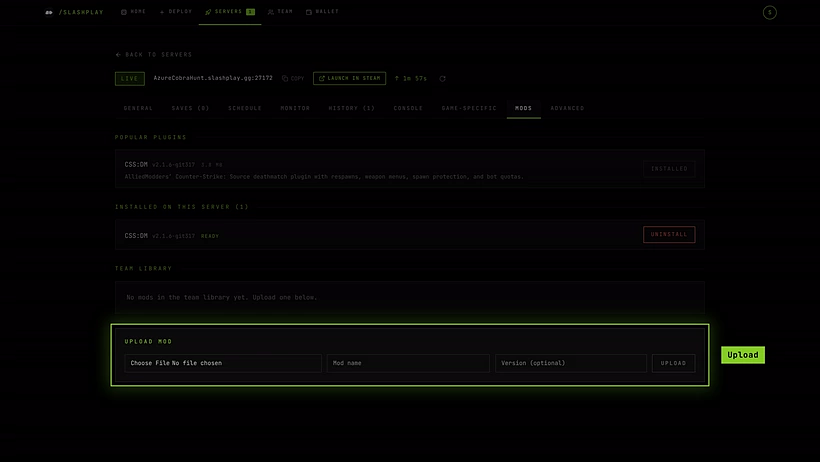
Popular plugins. Ready-made plugins you can Install in one click. Installed ones show Installed; ones that can’t run on this server show Incompatible, with the reason.
Installed (n). What’s installed here, with its status, and Uninstall. Empty: No mods installed. Add one from the team library below.
Team library. Mods your team has uploaded. Anyone on the team with Control servers can install them on any of the team’s CS:Source servers with Install, or remove them from the library with the trash icon. A mod that’s still installed on a server can’t be removed from the library until you uninstall it there.
Upload mod. Add a mod to the team library:
Steps
-
Choose a file. Up to 500 MB.
-
Type a Mod name, and optionally a Version.
-
Click Upload. The button shows the progress, and the mod appears in the team library when it’s done.

Choose the file, name it, then Upload. -
Click Install on it in the team library.
How installs are applied
-
If the server is Live, installing or uninstalling asks Restart to apply? (Connected players are disconnected, and it can take a minute or two before they can rejoin). Confirm with Restart & apply, and you’ll see Installed. The server is restarting to apply.
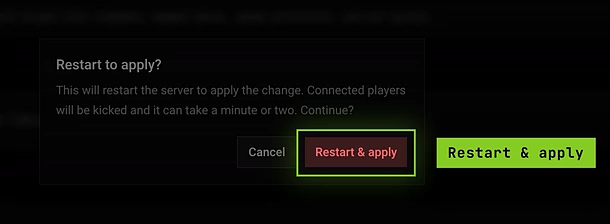
On a live server, installing asks to restart. -
If the server is stopped, it’s recorded and applied at the next start: Installed. Takes effect next start.
Package your upload the right way
What happens to your file depends on its type:
- A
.taror.tar.gzarchive is extracted intocstrike/. Build the archive so its folders start at that level, for exampleaddons/sourcemod/plugins/myplugin.smxandcfg/sourcemod/myplugin.cfg. Most SourceMod plugin releases for Linux are already laid out like this. - Any other file (including
.zipand a bare.smx) is placed as-is incstrike/. A bare.smxthere won’t load, because SourceMod only looks inaddons/sourcemod/plugins.
So for a single .smx, either pack it into a .tar.gz with the right folders, or upload it with the file manager straight into addons/sourcemod/plugins.
Installing never overwrites config files that already exist on the server (anything under cfg/ or addons/sourcemod/configs/, and any .cfg or .ini), so your edits survive a reinstall. Uninstalling removes the files the mod added, but never touches MetaMod or SourceMod’s own files.
Where things live
Open Advanced → Files and go into cstrike. The parts that matter:
| Folder | What’s in it |
|---|---|
cstrike/addons/metamod/ | MetaMod:Source. Managed by SLASHPLAY; leave it alone. |
cstrike/addons/sourcemod/plugins/ | Plugins (.smx). Every plugin here, and in its subfolders, loads at start. Move one into plugins/disabled/ to switch it off. |
cstrike/addons/sourcemod/configs/ | SourceMod settings, including admins_simple.ini. |
cstrike/addons/sourcemod/logs/ | SourceMod logs and plugin errors. |
cstrike/cfg/ | Server configs: server.cfg, and plugin configs such as cssdm/cssdm.cfg. |
cstrike/maps/ | Maps (.bsp). Upload custom maps here. |
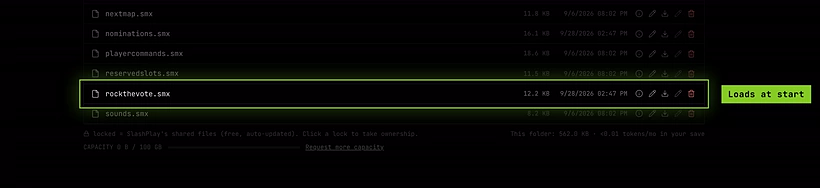
These folders are part of your server’s save, so what you add survives stop and restore. Files that SLASHPLAY ships show a lock: they’re shared, free and kept up to date for you. To edit one, click the lock to take ownership first; it then becomes part of your save and is billed as storage. See File manager.
After changing files, click Restart on the General tab so everything loads cleanly.
Make yourself a SourceMod admin
SourceMod admins can use admin commands in game, such as the !admin menu in chat. You add them in admins_simple.ini.
Steps
-
Find your Steam ID: join the server and run
statusin the Console tab. Your line shows an ID like[U:1:24691357]orSTEAM_0:1:12345678. SourceMod accepts either form. -
In the file manager, open
cstrike/addons/sourcemod/configs/admins_simple.ini. If it shows a lock, click it to take ownership first. -
Click Edit file and add a line at the bottom, using your own ID:
"STEAM_0:1:12345678" "99:z"zgives every admin permission, and99is the immunity level.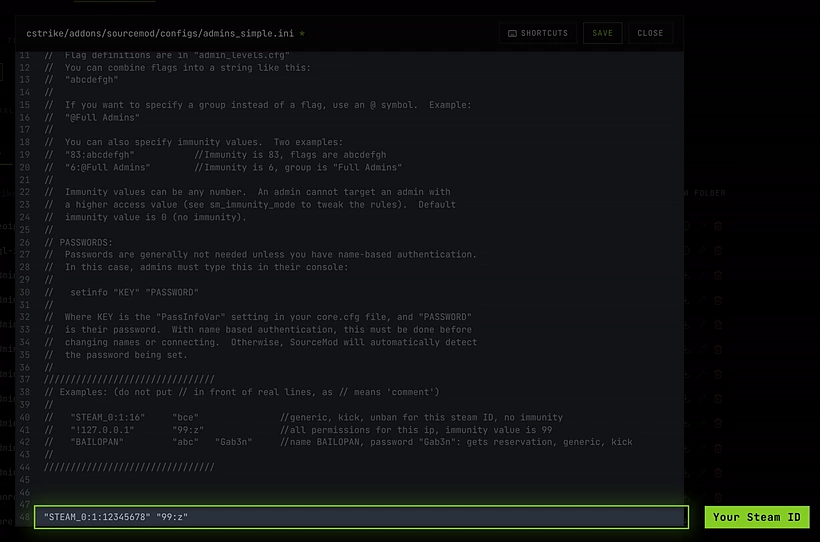
One line per admin: Steam ID, then immunity and flags. -
Save the file and click Restart.
-
In game, type
!adminin chat to open the admin menu.
Give full z access only to people you trust: SourceMod admins can kick, ban and change the map.
Troubleshooting
A plugin doesn’t show up in sm plugins list.
Check that the .smx is inside cstrike/addons/sourcemod/plugins/, not directly in cstrike/. Then look in cstrike/addons/sourcemod/logs/ for its error.
The console says Unknown command "sm".
SourceMod didn’t load. Restart the server. If you edited or replaced anything under addons/metamod or addons/sourcemod/bin, restore the originals by giving the folder back in the file manager.
The server crashes after installing a mod. Uninstall the mod from the Mods tab. If the server is stopped it applies at the next start. You aren’t charged for boots that crash, and a crashed server stays open for 30 minutes so you can uninstall it. See Crashes and debug mode.
Plugins shows the plugin as Incompatible. It needs a different SourceMod version than the 1.13 on the server, so it can’t be installed from there.