 /SLASHPLAY
Buy tokens
Top up your wallet from the Wallet tab: pick an amount from $1, pay securely with Stripe Checkout, apply a promotion code, and find your invoices later.
Read the transcript
This audio was created with Boson AI's Higgs Audio: boson.ai/higgs-audio
This page walks you through buying tokens: choosing an amount on the Wallet tab, paying with Stripe, and then moving the tokens into a team so your servers can use them. It takes about a minute. The smallest purchase is 100 tokens for $1, and tokens never expire, so there’s no reason to buy more than you need.
Before you start
- A SLASHPLAY account. Tokens go into your wallet, so you need to be signed in. See Create your account.
- A way to pay. Payment happens on Stripe’s secure checkout page. SLASHPLAY never sees your card details.
Steps
Step 1: Open your wallet
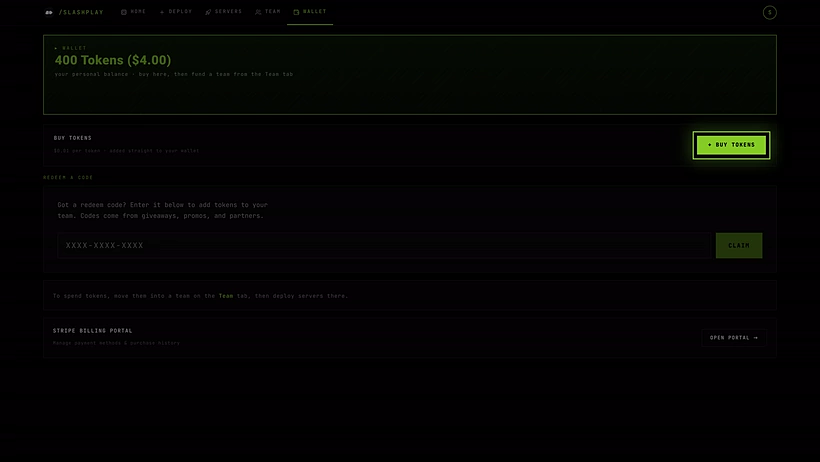
Open your dashboard and click Wallet in the top bar. At the top you see your wallet balance in tokens and dollars, with the reminder your own tokens, before they go to a team.
Click Buy tokens.
Step 2: Pick an amount
The Buy tokens screen offers three ways to choose. Every token costs $0.01.
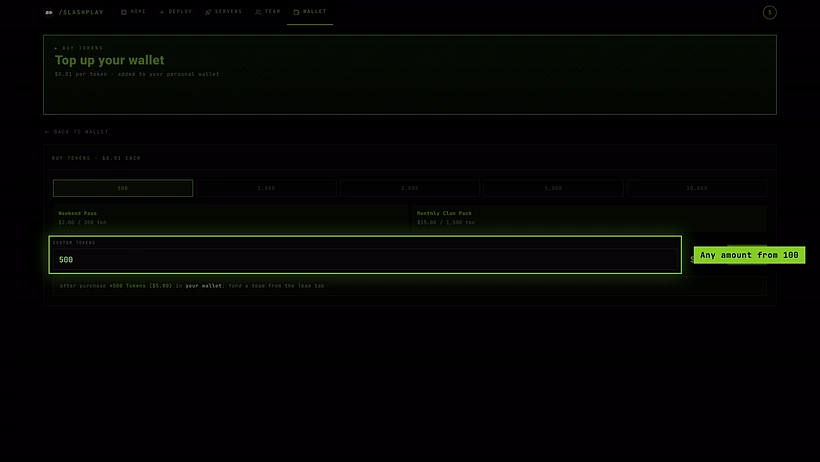
Quick amounts. Click 500, 1,000, 2,500, 5,000 or 10,000 to fill in that many tokens. The Total next to the box updates: 500 tokens is $5.00, 10,000 is $100.00.
Packs. Two named packs take you straight to payment in one click:
| Pack | Tokens | Price | Roughly |
|---|---|---|---|
| Weekend Pass | 200 | $2.00 | 66 hours on a small server |
| Monthly Clan Pack | 1,500 | $15.00 | 500 hours on a small server |
Packs are priced exactly like any other amount. They’re just shortcuts.
Or any amount. Type any whole number of tokens into the field labelled Or any amount · 100 to 100,000. The minimum is 100 ($1.00); below that, the page shows Minimum 100 tokens ($1.00). and the pay button stays off. The maximum for one purchase is 100,000 tokens ($1,000).
Under the field, the page confirms what you’ll get: +500 tokens ($5.00) go to your wallet. Move them into a team on the Team tab to spend them.
Step 3: Pay with Stripe
Click Pay $5.00 (or a pack; the price matches the amount you picked). You’re taken to Stripe Checkout, a secure payment page run by Stripe. It shows the number of tokens and the total.
- Pay with a card or any other method Stripe offers you there.
- Have a promotion code? Enter it on the Stripe page, in the promotion code field, before you pay. The discount is applied to the total. (Promotion codes are different from redeem codes, which you enter on the Wallet tab and which give you free tokens.)
Changed your mind? Use the back link on the Stripe page. You return to your dashboard and nothing is charged.
Step 4: Check your wallet
After paying, Stripe sends you back to your dashboard. The tokens arrive in your wallet within a few seconds. Open the Wallet tab to see the new balance.
Step 5: Move tokens into a team
Tokens in your wallet can’t run a server yet. Move them into the team whose servers you want to run:
- Open the Team tab and enter the team.
- Under Fund this team, type an amount or click Max.
- Click Deposit.
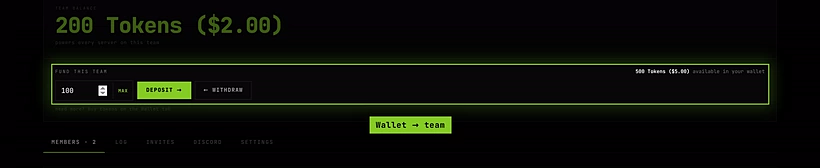
See Fund a team for the details. If you try to deploy on an empty team, the Fund & deploy button does this step for you.
Invoices and the billing portal
Every purchase gets an invoice from Stripe. To see them, and to manage saved payment methods:
- Open the Wallet tab.
- Under Billing (Receipts and payment methods live in Stripe’s billing portal), click Open portal.
The portal opens in a new tab, run by Stripe. It only works after your first purchase: before that there’s no billing account to show.
How it works
- One price. Tokens always cost $0.01 each. There are no bulk discounts, subscriptions or plans; bigger amounts just mean fewer top-ups.
- Your wallet, not a team. Purchases always land in the buyer’s personal wallet, whichever team you have open. That way you decide which team gets them.
- Nothing expires. Unused tokens stay in your wallet until you move them.
- A receipt for everything. Each purchase is a separate Stripe payment with its own invoice in the portal.
Troubleshooting
I paid but my wallet didn’t go up. Give it a few seconds and refresh the Wallet tab. The payment confirmation from Stripe can take a moment to arrive. If the tokens still aren’t there after a few minutes, ask for help in the SLASHPLAY Discord with the time of the payment.
I bought tokens but my server says the team has none. Purchases land in your wallet, not the team. Deposit them into the team. See Fund a team.
The pay button stays grey. The amount is below the 100-token minimum, or empty.
Open portal gives an error. You haven’t made a purchase yet, so there’s no billing account. It works after your first purchase.