 /SLASHPLAY
Start your first server
Get any game server live on SLASHPLAY in six steps: pick a game, choose a size, deploy, invite your friends, then save and stop it when you're done.
Read the transcript
This audio was created with Boson AI's Higgs Audio: boson.ai/higgs-audio
This is the quick start for every game on SLASHPLAY. In six steps you’ll deploy a server, get your friends onto it, and stop it again so it stops costing anything. The steps are the same for CS2, Minecraft, Valheim or any other game; where a game does something differently, this page says so and links to that game’s own guide.
Plan on about five minutes, most of it waiting for the server to boot.
Before you start
- A SLASHPLAY account. Sign in at slashplay.gg/dashboard with Discord or Steam. See Create your account.
- Tokens on your team. New accounts start with 6 tokens, enough for about two hours on a small server. If you’ve used them up, buy some (from $1) and move them into your team.
- The game itself, installed on the computer you play on.
Step 1: Open the Deploy tab
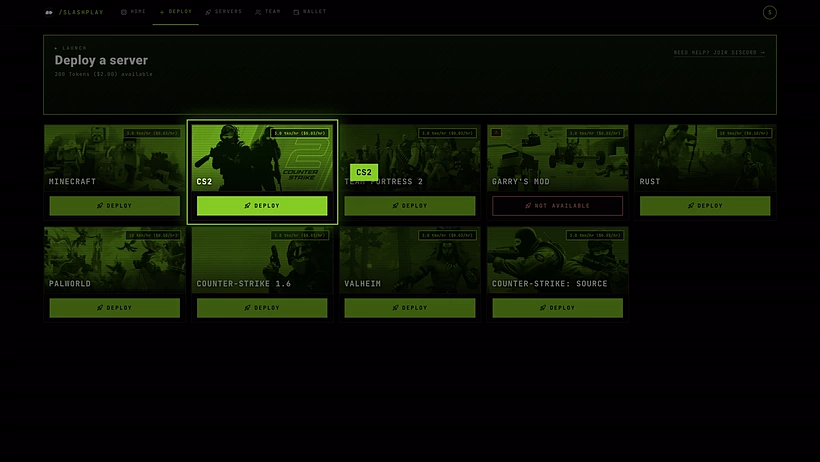
Sign in and click Deploy in the top bar (or Deploy on the Home tab). You’ll see a card for every game SLASHPLAY hosts, each with its price per hour.
Step 2: Pick your game
Click Deploy on the card of the game you want. A small window opens.
If a card says Updating…, SLASHPLAY is installing a new patch for that game. Wait a few minutes and try again.
Step 3: Choose version, region and size
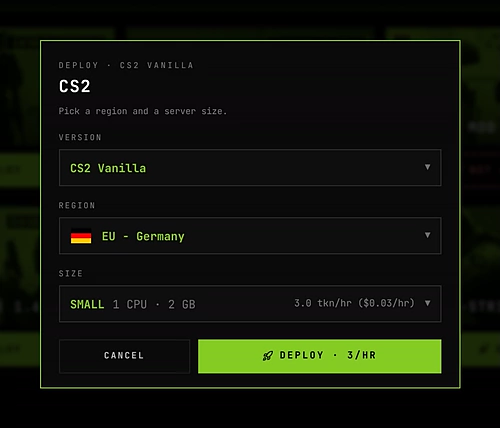
The deploy window asks up to four things. Fields that have only one possible answer are hidden.
- Team: only shown if you can deploy to more than one team. Each row shows that team’s balance. The team pays for the server.
- Version: only shown for games with more than one version. Today that’s CS2 (CS2 Vanilla is the game as Valve ships it) and Minecraft, where you choose between Paper (latest), Vanilla (latest) and Paper 1.21. See Minecraft versions.
- Region: where the server runs. Pick EU - Germany, the region that’s live today. The others are coming soon, and picking one lets you vote for it. See Regions.
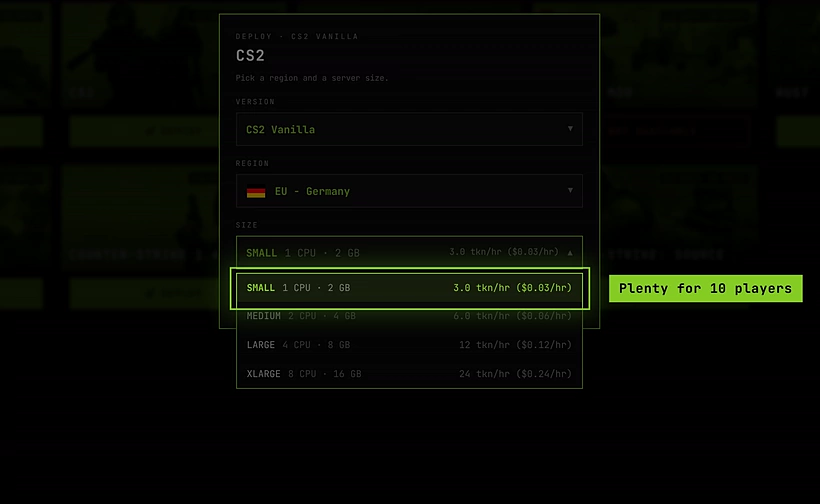
- Size: how much CPU and memory the server gets. SMALL (1 CPU, 2 GB) is plenty for most games with a group of friends, and you can change it later while the server is stopped. See Server sizes.
Step 4: Deploy and wait for Live
Click Deploy · 3 tokens/hr ($0.03) (the price matches the size you picked). You’re taken to the Servers tab, where your server appears with the status Starting.

Most servers are live within a minute. The card shows what’s happening while you wait, and if a boot is slow, SLASHPLAY retries it on its own. A server that crashes while starting costs nothing.
The server gets a random three-word name, like GrandOspreyFeather. You can rename it later on its server page.
Step 5: Join and invite your friends
When the status turns Live, the card shows the server’s address and buttons to join it.

To join yourself:
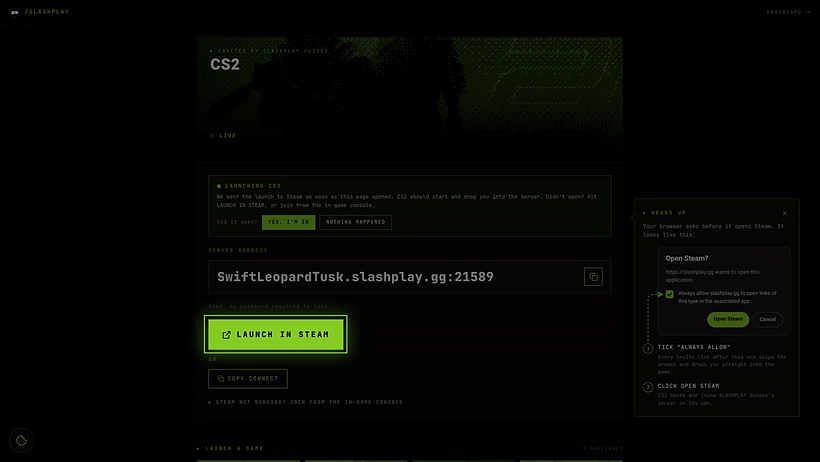
- Steam games (CS2, Counter-Strike: Source, Counter-Strike 1.6, Team Fortress 2, Garry’s Mod): click Launch in Steam to start the game straight into your server, or Copy invite the connect command and paste it into the game’s developer console.
- Minecraft: copy the address (it has no port number) and add it in Minecraft under Multiplayer → Add Server.
- Valheim and Palworld: copy the address and connect to it from inside the game. Valheim always asks for the server’s join password, which is shown on the card.
To bring your friends, click Invite page. It opens your server’s invite page in a new tab: copy that page’s URL and send it to them. The page shows the address and, for Steam games, launches the game for them in one click. Your friends don’t need a SLASHPLAY account.
See Connecting and inviting for every way in, and Join passwords to keep strangers out.
Step 6: Save and stop
When you’re done playing, click Stop on the server card. SLASHPLAY saves the server’s files, shuts it down, and the hourly cost stops.

Next time, click Start on the stopped server. It comes back with the same settings and the files from its last save, with a new address and invite link.

Your game’s own guide
Each game has a start page with the details that are specific to it: default maps, how to join, what the game-specific tab can do.
| Game | Start page |
|---|---|
| Counter-Strike 2 | Start a CS2 server |
| Minecraft (Java Edition) | Start a Minecraft server |
| Counter-Strike: Source | Start a Counter-Strike: Source server |
| Counter-Strike 1.6 | Start a Counter-Strike 1.6 server |
| Team Fortress 2 | Start a Team Fortress 2 server |
| Garry’s Mod | Start a Garry’s Mod server |
| Valheim | Start a Valheim server |
| Palworld | Start a Palworld server |
What happens next
Once your server has run once, click Manage on its card to open the server page. From there you can:
- Change the name, size and join password on General. See The server page.
- Take backups and download saves on Saves. See Saves and backups.
- Start and stop on a weekly schedule on Schedule. See Schedules and auto-stop.
- Type server commands on Console. See The console.
- Upload maps, plugins and config files on Advanced → Files. See The file manager.
Troubleshooting
The deploy button says Fund & Deploy. The team you’re deploying to has no tokens. Move some from your wallet, or buy more. See Fund a team.
“Not enough tokens. You need at least N tokens (1 hour) to deploy.” A deploy needs at least one hour’s worth of tokens on the team. Add a few tokens, or pick a smaller size.
The server is stuck on Starting. Slow boots are retried automatically. If it ends up Crashed, the boot isn’t charged: click Start the game again on the server page. See Crashes and debug mode and Troubleshooting.
My friends can’t connect after I restored the server. The address and invite link change every time the server starts. Copy them again from the server card and send the new ones.